Adding farmhouse style trim to our home
We’re slowly transforming our 90s builder-grade home into a modern farmhouse, and one of the first things we did was add farmhouse trim to our home.
We started with farmhouse baseboards, then replaced all the doors for more of a craftsman style and trimmed those out using a farmhouse door trim and finally, we’re replacing our 30 year old windows and wrapping those with trim, too.
When I use the term farmhouse trim, know that it’s pretty much synonymous with craftsman style trim in terms of the overall look and feel.
If you’d like to add craftsman style trim to your home, here’s the exact process we followed for our doors, windows and baseboards.
This post contains affiliate links. Read our policy here.
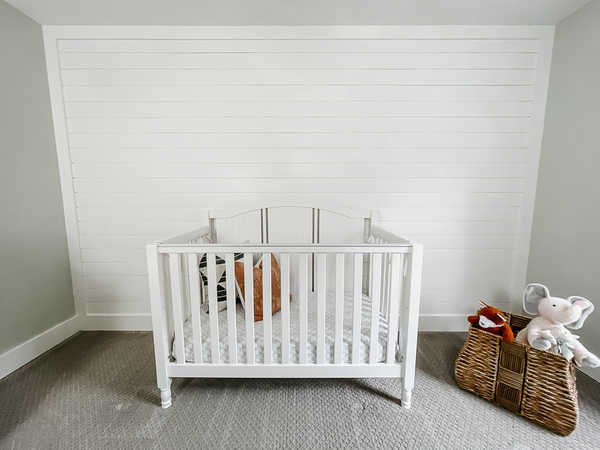
Farmhouse baseboard trim
When we moved in to our home, the baseboards were pretty short, run-of-the-mill design you see on most spec homes.
One of the first things I demoed was our fireplace and while I was doing that, I decided just to rip out the baseboards and door trim too.
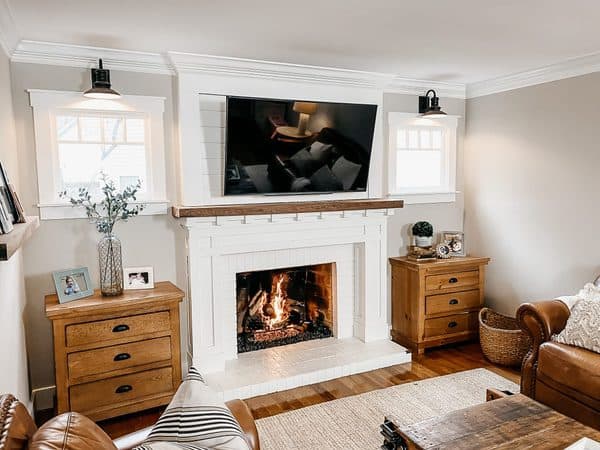
I cannot tell you how much of a difference the taller, thicker baseboards and door trim made–it completely transformed our home.
All of our craftsman style trim is painted in benjamin moore white dove.
Steps to install farmhouse baseboard
As a general aesthetic rule of thumb, you typically need your baseboard height to be greater than your door and window trim widths by at least 50 percent, but not more than 100 percent.
For example, if your door casing trim is 3.5” like ours, you’d want your baseboards to be at least 5.25” for the baseboards to look substantial enough. There’s nothing worse than undersized baseboards.
We went with 1 x 6 Primed fingerjoint boards for our base (actual measurement of a 1 x 6 is ¾” x 5.5”). Please note, we did not use MDF board for any of these projects; instead used real wood.
When selecting your baseboard material, take into consideration the other trim in your house. Because all of our mouldings now have square edges and flat surfaces, we matched our baseboards to this look.
If your trimwork is highly detailed or has wavy profiles to it, then you may want to choose a base with base cap, which comes already on some baseboards but can be purchased separately and added atop a simple 1 x 6 board.
Farmhouse trim around windows
Step 1: Remove old trim
To get the craftsman style window trim around your windows, you’ll first remove existing trim from windows, including side and overhead trim as well as sill and trim board under sill.
Remove this trim using a utility knife to score the old caulking lines. If you don’t do this, you’ll end up pulling large sections of the drywall paper surface up with your molding that will require repairs later.
Step 2: Remove caulking residue
Once you’ve removed the trim and any nails still protruding from the window frame, you’ll notice that (in most applications) the wood frame of the windows sits flush with your drywall surface.
Scrape any caulking residue off of this frame with a chisel and lightly sand it so that the wood is smooth. Your new trim work will only cover half of the frame in the same way that the old trim did, so don’t skip this step!
Step 3: Take measurements
Begin by measuring the width of your vertical trim pieces. I used 1 x 4 primed fingerjoint for sides, bottom trim board and top piece. These boards typically measure 3.5” wide.
Now measure the window frame board thickness – this is that outer perimeter board that should be sitting flush with your drywall. These are most often around ¾” thick. Mark a line at the middle thickness of this board, which would be ⅜”. From this line, you’ll want to measure over 3.5” and mark a line on the wall. Do this at the top and bottom of both sides of the window.
Step 4: Make your cuts
Take a level or long straight edge and draw a line down the wall, carrying it at least 3 inches below the window frame on both sides. The distance between these two lines is the length you should cut your first board, the bottom horizontal trim board. Cut it and install it so that it protrudes over the angled window frame bottom by about ½”.
The next board we install is the sill, which rests atop this first trim board. I used a 1 x 3 primed finger joint board, laid flat. I cut this board so that it overhung the board beneath it by ½” to each side, so I cut it 1” longer. Nail this board straight down into the board beneath it.
Step 5: Install vertical boards
Now you’re ready for your vertical boards. You already have your line drawn to help position them, but now you need to know how tall they need to be. Just as they overlap the window frame by half its thickness, they also need to extend to the height of halfway through the upper frame board.
So measure from the top of your newly installed sill to half of the thickness of the upper window frame board. Do this on both sides – don’t assume that the measurement will be the same for both.
Once cut, install these with a few nails into the inner edge of the boards to catch the wood frame and a few nails through the outer side of the board into the drywall at opposing angles to allow the nails to hold the board in better.
Step 6: Add the top board
Next up is the horizontal board that will rest on top of these two boards. Measure the distance between the outer edge of both boards and add 1” to achieve the ½” overlap on each side.
As with the vertical boards, nail the lower edge of the board into the frame behind it with a few nails, then nail the top of the board into the drywall behind it at opposing angles.
Finally, you’re ready for the last board. For this board I used a 1 x 2 primed fingerjoint board. Cut this board 1” longer than the board beneath it to allow for a ½” overhang on both sides. Nail from top into board beneath it once it’s centered.
Farmhouse door trim
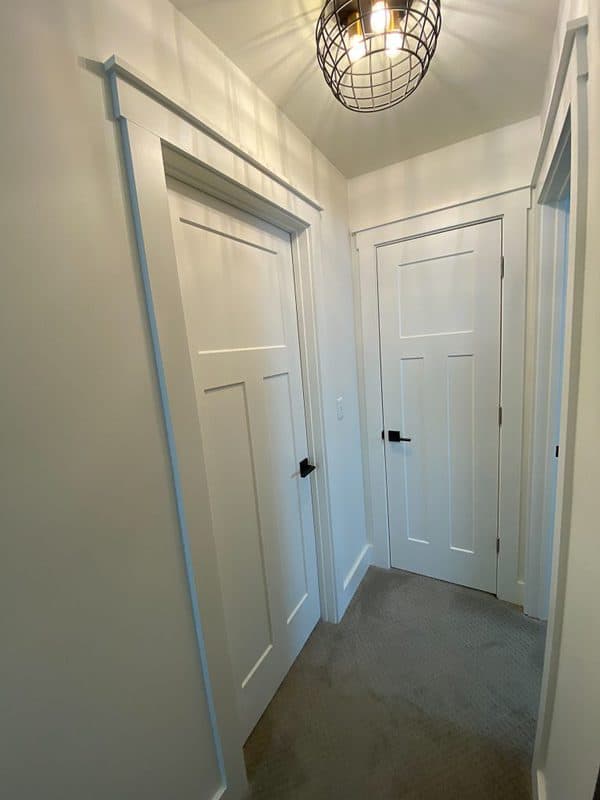
Here’s how to add farmhouse door trim to your interior doors:
Step 1: Remove existing door casings from sides and top of door
As with your window mouldings, trim the caulking lines with a knife before attempting to remove the moulding in order to protect your walls.
Once you’ve removed the trim and any nails still protruding from the door frame, you’ll notice that (in most applications) the wood frame of the door sits flush with your drywall surface.
Scrape any caulking residue off of this frame with a chisel and lightly sand it so that the wood is smooth. Your new trim work will only cover half of the frame in the same way that the old trim did, so don’t skip this step!
Step 2: Use dremel to cut back existing baseboards (if you’re keeping them)
If you are keeping your existing baseboards, you’ll need to cut them back with a Dremel to the distance that your new trim width will end up. If you don’t have a dremel, you can remove the baseboard (carefully) and cut it to the new length after your door trim is in.
I suggest the Dremel. If you don’t regularly uninstall trim as part of your profession, you’ll find it’s very easy to to crack it in the process. If you were able to take off the door trim without breaking it, then maybe you can give the baseboards a shot.
Step 3: Take measurements and make cuts
Begin by measuring the width of your vertical trim pieces. I used 1 x 4 primed fingerjoint for the sides and the top piece. These boards typically measure 3.5” wide.
Now measure the door frame board thickness – this is that outer perimeter board that should be sitting flush with your drywall. These are most often around ¾” thick. Mark a line at the middle thickness of this board, which would be ⅜”.
From this line, you’ll want to measure over 3.5” and mark a line on the wall. Do this at the top and bottom of both sides of the door. Take a level or long straight edge and draw a line down the wall.
Now measure from the floor to the top of the door frame and subtract ⅜”. Cut your side 1x4s and install them along the line you drew on the wall. Don’t worry, the caulking and paint process will hide the line.
Install these with a few nails into the inner edge of the boards to catch the wood frame and a few nails through the outer side of the board into the drywall at opposing angles to allow the nails to hold the board in better.
Next up is the horizontal board that will rest on top of these two boards. Measure the distance between the outer edge of both boards and add 1” to achieve the ½” overlap on each side.
As with the vertical boards, nail the lower edge of the board into the frame behind it with a few nails, then nail the top of the board into the drywall behind it at opposing angles.
Finally, you’re ready for the last board. For this board we used a 1 x 2 Primed Fingerjoint board. Cut this board 1” longer than the board beneath it to allow for a ½” overhang on both sides. Nail from the top into the board beneath it once it’s centered.
Related farmhouse decorating tips and design
Our go-to farmhouse colors
Keep reading:
What’s the difference between shoe moulding vs. quarter round?


Excellent aesthetic coupled with practice how-to’s. We’re designing new construction and this will fit right in.