8 ways to update a dated kitchen on a limited budget
Do you have a limited budget and kitchen that is so dated that you absolutely cannot stand to look at any more? In today’s post we’re going to look at 8 real-life examples of how small budgets and a lot of paint and elbow grease absolutely transformed dated kitchens into magazine-worthy spaces.
I want to note that most of these kitchen updates were done on an extremely small budget of $1000 or less.
Upgrading brown granite with neutral colors

When working with brown dated granite, your ultimate goal is to distract from the eyesore. I’ve seen these done in two ways, by going all in on bold dark colors for the cabinets and room or by choosing soft neutral colors that relate to the countertops.
Erika from Designing Vibes chose to neutralize her space, selecting Benjamin Moore Northern Cliffs, a warm greige paint color with a green undertone for her cabinets and Sherwin Williams Shoji White (a cream paint color with a green undertone) for the walls in her kitchen.
Now, here’s why this kitchen turned out beautifully, over say a kitchen like this:

Often when people want to update kitchens, especially kitchens from the 80s and 90s when there was just so much brown–brown cabinets, countertops, backsplashes, etc, their thought is to rush and paint their cabinets blinding white.
This unfortunately ends up looking very cheap, as the bright white cabinets make your granite stick out like a sore thumb, which is the opposite of what you want to do. Updating brown countertops can absolutely be done, as we saw above, but it must be done with intention.
The key here is to find a paint color that’s still light while simultaneously relating to the undertones in your granite. If you have no idea where to start, sample cream, greige or even taupe paint colors. Most off white colors will be too stark for brown granite, unless your granite is on the lighter side of things.
Now back to the stunning kitchen above, Erika also updated her cabinet hardware, lighting, and added a few modern accessories to make the whole space feel new again, and wow, doesn’t it?!
Upgrading brown granite with dark paint colors

If you’ve been following Chris Loves Julia for a while, you know they famously took a very boring and very outdated kitchen and transformed it with paint. You can see the budget breakdown on their post, but all in all, this makeover was very close to $1000, which is just a testament to how hard paint works when you know what you’re doing.
A great way to update a kitchen with dated honey-stained wooden cabinets and brown granite is to go bold. It’s almost like the bold color is just so mesmerizing that you forget about the brown granite completely.
In the CLJ kitchen they used the color Thunderous by Sherwin Williams, which is a very dark green with a strong gray undertone. I think sagey-green or gray green paint colors work really well to update kitchens like this and have a whole post dedicated to pretty gray-green paint colors if that’s a direction you want to go in.
Of course they also changed out the lighting, swapped out the knobs, changed out the plumbing fixtures, added a vertical shiplap backsplash and did a good bit of styling to the space. All inexpensive tweaks that can make a huge difference!
Dated kitchen with laminate cabinets refresh

Here’s another beautiful transformation from Angela Marie Made. Sticking to a strict budget of $1000, Angela upgraded this kitchen which was a boring builder grade kitchen complete with laminate cabinets, no backsplash, and no personality!
One of the hardest working items in this space is the subway tile. I will recommend installing subway tile until the day I die, as it’s so timeless and affordable. Now, of course, as in all things, you can spend more on subway tile or less.
Did you know you can get subway tile for as low as .10-.20 a piece? We installed very inexpensive tile in our master bath (I think it was .10 a piece then) and it looks gorgeous. Picture below for reference:

Just to give you a frame of reference for how cheap that is, most kitchens will use an average of 20-40 sq feet of tile.
Let’s say you can find subway tile for .15 a piece and you have 40 sq feet that you need to tile. That’s a grand total of $55 for subway tile. If you do the work yourself, that’s an insanely cheap way to upgrade a space.
I want to point out that she kept the same appliances, which although they are dated, you don’t even notice them, that’s how effective this kitchen makeover is!
Besides the tile, they also installed floating shelves, which if you can spare the space, is a great way to reduce bulk in a smaller, u-shaped kitchen.
Another recommendation I’m always giving clients looking to update a kitchen is to take the cabinets all the way to the ceiling, and they achieved that by inclosing the space above the cabinets and finishing it off with crown moulding.
In terms of paint doing some heavy lifting in this kitchen, they chose White Dove by Ben Moore for the upper cabinets and Agreeable Gray (a warm greige with a green undertone) for the lowers.
White Dove works for this kitchen and coordinates with Agreeable Gray well. They luckily didn’t have any brown tones to contend with, but rather with black countertops, so really the sky was the limit in terms of paint colors that would have worked here. I’m a fan for the neutral tones, though.
They also did a diy range hood that really elevated the space and updated cabinet hardware. All in all, this is a majorly impressive kitchen for $1000, and easily looks likes way more was spent to bring this kitchen up-to-date.
Builder grade “ugly” kitchen gets a facelift on the cheap

When Lauren from Bless’er House moved in her kitchen certainly wasn’t horribly dated. She had white cabinets, leathered granite and tile floor. Now, mind you the granite wasn’t a warm white quartz or a timeless black leathered granite, but in terms of outdated kitchens, this is certainly not that bad.
But just because your kitchen isn’t that out-of-date doesn’t mean you have to live with it if you don’t like it. After all, you do spend the majority of your time in the kitchen, so why not love it?
Paint transformed this kitchen and like the other examples we’ve seen above basically made the brownish-green granite disappear. Lauren used Benjamin Moore Simply White (a bright, off-white) on the walls and Sherwin Williams Billiard Green on the lowers.
Updated knobs and pulls, brass lighting and beautiful styling transformed this kitchen. She also had a very busy pencil tile backsplash (never something I recommend) and replaced that with very inexpensive “tin” style backsplash.
Dated cabinets transformed with paint

This kitchen was rough looking before and was beautifully transformed by I spy DIY. I’m talking severely out-of-date wooden cabinets, formica countertops, dated backsplash and a dated floor tile.
To transform this kitchen, Jenni used a Rustoleum product on the cabinets in a greige color, which was a perfect choice considering they weren’t replacing the floors.
Butcher block is a very inexpensive material that can very cheaply transform a kitchen and bring a good bit of warmth to the space. I
nexpensive subway tile comes to the rescue again, transforming an unimpressive kitchen to a gorgeous space.
Beyond painting the cabinets, Jenni also updated cabinet hardware, added a new sink, dishwasher and faucet.
As you’ll notice with all of these kitchen makeovers, styling really works to disguise unsightly kitchens and this kitchen is no exception. The beautiful copper pots provide some elegance and that wonderful “lived-in look”, and of course, the rug works well to hide the floor.
I also want to take a moment to talk about the gorgeous wall color. Now that wall color was already on the walls, and it looks to be like a green-blue color with perhaps a slight gray undertone, maybe like Benjamin Moore’s Watery or Behr’s Watery.
All brown kitchen transformed into a modern moody space
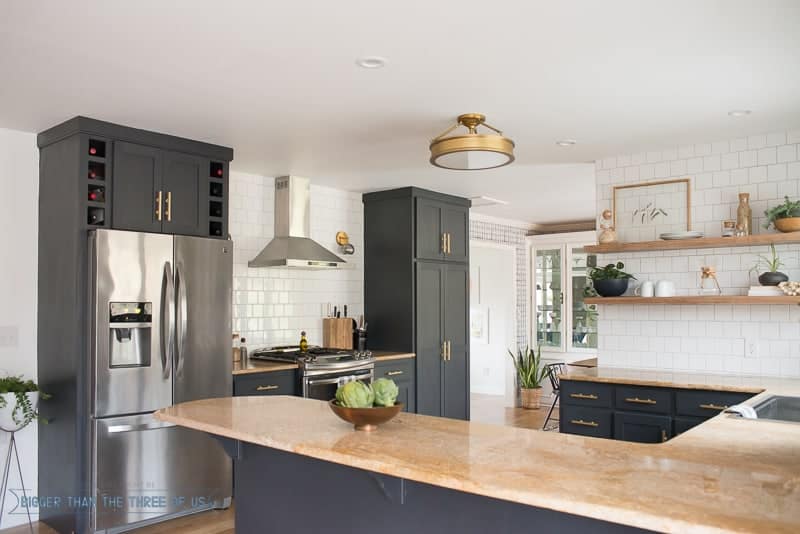
Subway tile and paint save the day again in this kitchen by Bigger than the three of us. You might be noticing a pattern at this point with dark, moody colors really working to camouflage dated granite.
In this kitchen, Behr’s Cracked Pepper was used, which is actually their 2024 paint color of the year. Cracked Pepper is a soft black, a lot like Sherwin Williams Iron Ore.
Now, they added some cabinets and did some cosmetic work in addition to upgrading some appliances, lighting, etc, and the whole budget totaled to around $15,000.
But again, I think just adding subway tile, painting existing cabinets, keeping all appliances and adding inexpensive knobs and pulls and upgrading lighting could have kept this kitchen closer to the $1,000 budget range.
Outdated brown granite gets a makeover

Believe it or not, this kitchen had cherry cabinets, patterned tuscan-style backsplash and of course, still the same granite you see above.
Just like with many of the examples we’ve seen above, Marynn from Wildflower Home really leaned into the moody paint color strategy to disguise her dated granite by painting her cabinets. She used a fusion mineral paint that was a dark green gray, maybe something similar to Sherwin Williams’ Rushing River.
She also replaced a dated and tired stone backsplash with vertical shiplap painted in the same color as the cabinets.
Light fixtures, cabinet hardware, and some clever styling also made this kitchen look and feel like a million bucks. Lastly, she used some paint and a whole lot of painters tape to create a checkered floor to hide the ugly tile floor.
Cherry kitchen update without painting the cabinets

Now sometimes you don’t want to repaint the cabinets and in the case of Simply 2 Moms, they opted to work with their cabinets, only painting the island and replacing the countertops and backsplash to add some light to this darker and dated kitchen.
With a budget of $10,000, which is larger than what we’ve seen in most of these kitchen makeovers, but still considerably less than a full blown kitchen Reno, Anne chose Revere Pewter lightened by 75% for her island, which ended up looking like a cream paint color.
To modernize her kitchen she added raised panels to the island, replaced small support brackets with old table legs, added new barstools, replaced the pendant lighting, changed out the skinny pencil tile for a more neutral white tile, replaced the hardware, relocated the microwave and added a stainless steel hood.
The real stunner in this kitchen is the off-white quartz that was chosen to replace the dark brown/green granite.
Another great project!
I hope you’ve gained inspiration from these projects and observed how a small budget can impact such a large space. If you enjoyed this post, please let me know in the comments because I may start a series!

