DIY Herringbone table: your step-by-step guide
Recently, we had a client that wanted a herringbone table for her outdoor space. We thought we’d take you along and show you how to make your own, with these step-by-step instructions.
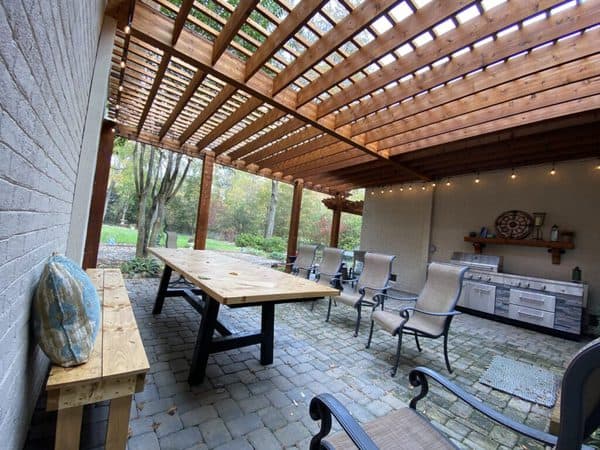
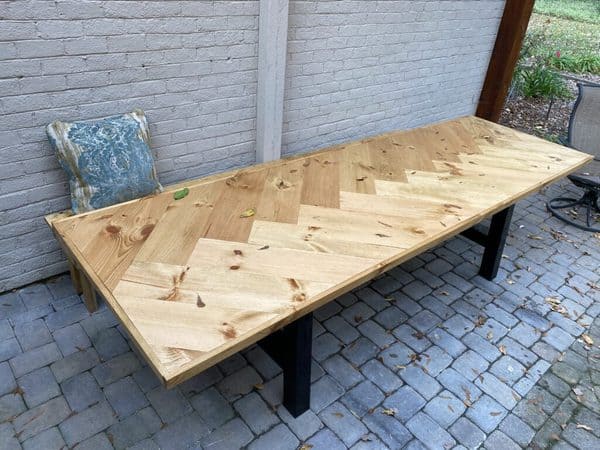
DIY herringbone table
Step 1: Plywood Base
Determine the size table you want to build and purchase a ¾” thick piece of plywood capable of accommodating that size.
This particular table was 10 feet long, and because I didn’t want to have a joint in the plywood, I found a local lumber yard that could order 4’ x 10’ plywood. Some lumber yards stock 5’ x 9’ plywood which many people use to make their own DIY ping pong table, so you may get lucky and find that.
Otherwise, you’re stuck waiting on a larger sheet of plywood after you order it, or you’ll need to make your table 8’ long, since most plywood sheets come 4’ by 8’.
Most designers recommend a 24” space per person at a dining table to allow for elbow room, so an 8’ long table should be able to easily seat 4 people per side, so a minimum of 8 people if no one sits at the ends.
This particular table was only 30” wide, but most dining tables tend to be a minimum or 36”.
Step 2: tabletop material
Decide what kind of material you’d like to use. We went with 1 x 8 Whitewood. This wood is very light in color and had just enough knots in it to make our design interesting.
The light color had very little yellow in it, so we could choose almost any color we wanted for the stain.
Some pine boards will be too yellow to attempt to achieve a neutral or grayish wood look, so whitewood gives you the most flexibility. When choosing your wood, make sure that you check each individual board for warping or bowing.
Set the boards right up to your eye and look down the length of the board. You’ll probably end up selecting every third or fourth board you check to find the best material.
Step 3: Get started on the build
You’ll also need your perimeter boards. We used 1 x 2 Whitewood so that the finishing would match uniformly with the same species of wood. Again, check each one of these boards for warps and bows.
Step 4: Dimensions
Cut the plywood to the length and width you’d like your table, minus 2X the thickness of your perimeter boards.
Most 1×2 material will be ¾” thick, so ¾” x 2 = 1.5” So you’ll subtract this 1.5” number from your total desired width and length of your table and cut your plywood to those dimensions.
Now mark the center of the plywood at both short ends, and draw a line down the length of the middle using a straight edge.
Mark this center point at several intervals if you don’t have a straight edge long enough.
Now draw a 45 degree angle from this center point to the side of your table.
Here’s a quick and precise way to cheat at this without have a framing triangle handy… Measure from the corner to your center mark. Let’s say it’s 15” like it was for me.
Now measure from the same corner up the length of the table and make a mark at 15”. Take your straight edge and draw a line between the two marks, and you will have created an exact 45 degree angle.
It’s extremely important that this be very precise, because the herringbone pattern will not be perfectly centered at the other end if you are slightly off.
Step 5: Find the true center
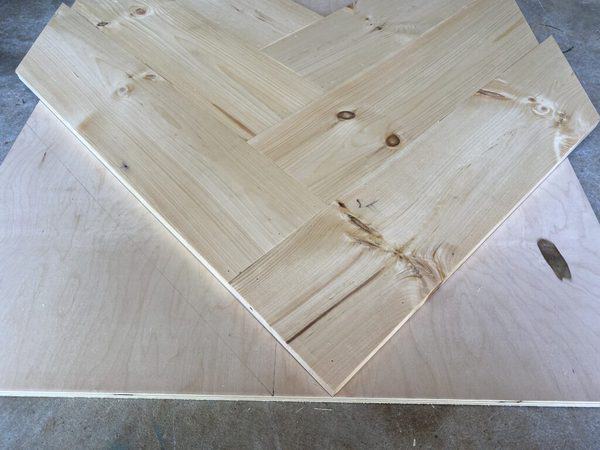
Remember those math questions in middle school they made you solve about the two trains leaving two different cities at two different velocities converging at an unknown point that you had to solve for?
This is not quite that bad, so you should be fine. This is a very important but somewhat confusing step before you can begin cutting and installing your surface boards.
Measure the width of the boards you chose. If they are 1×6 material, the width will be 5.5”, or very close to that.
Now, measure from one of the corners of the board up the length and mark the side at 5.5” (or whatever the width of your material is).
Next, take a straight edge and draw a line from the opposite corner to this point. You have created a perfect 45 degree angle just like you did on your plywood surface, but for a different reason this time.
Now, measure the distance from your opposite corner to the line you drew. For a 1 x 6, this will be around 3.75”. Now, divide this by 2, and you get 1 ⅞”.
Finally, go back to your plywood and take 1 ⅞” off of your first measurements from the corner and draw a new line using these two new points.
So for our table, we drew a line at 15” from the corner in both directions, so we subtracted 1 ⅞” from 15” to get 13 ⅛” and drew our new line. This is the new line where you install your first board! See? That wasn’t so bad.
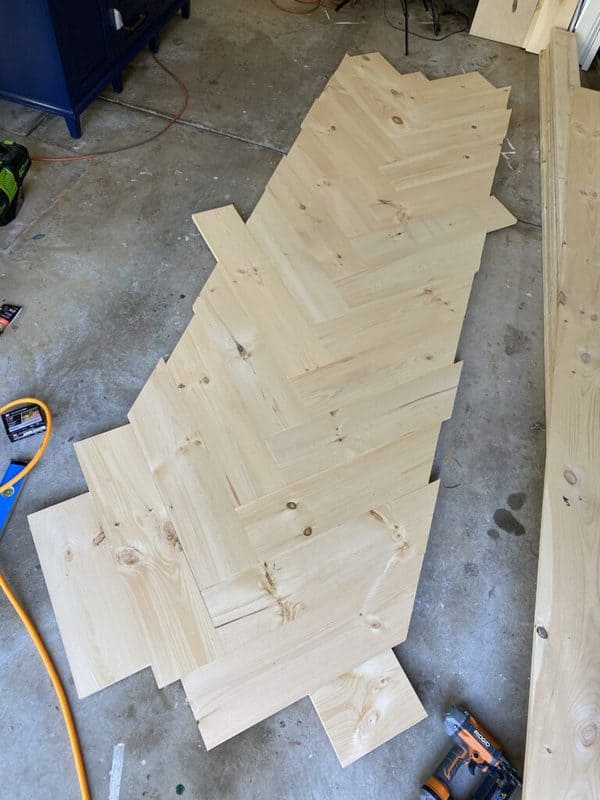
Step 6: Installing the surface boards
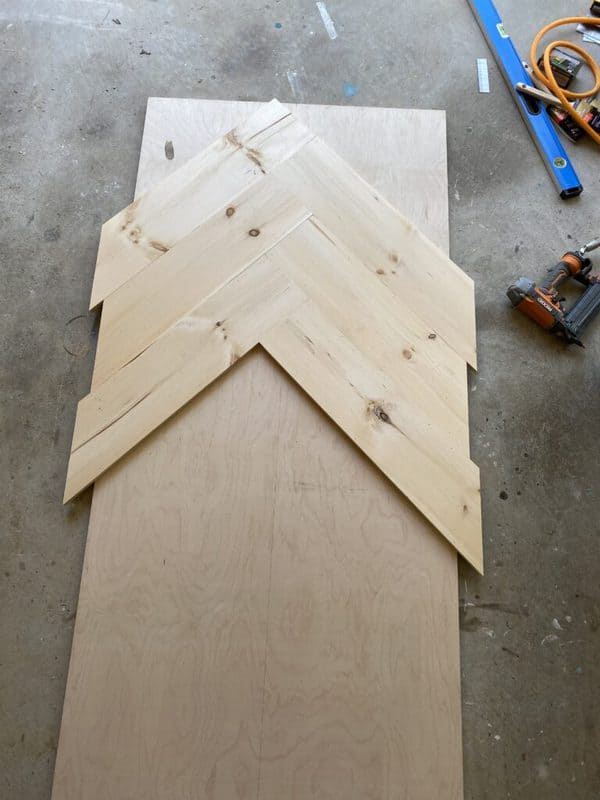
Start your first board along the line you drew for your new center.
All boards should hang over the edge of the plywood by at least 1” so that you’ll have plenty of material for your saw to cut through at the end.
You can use cut pieces to fill in the corner gaps at the end, so begin your second board by forming a “V” at a right angle.
Line this board up very carefully to make sure it’s a perfect right angle. Use a large framing square if you have one. Another essential practice for each board you install is to cut it first with a miter saw.
This will not only get rid of the rough factory edge but will ensure that your board is cut to a perfect 90 degrees.
Continue this process all the way up the table top, staggering your boards left and right, making sure that each end is cut before installation and that each board hangs over the edge of your table top by at least 1” along the way.
One thing I did to save material was to cut the overhang piece at a 45 degree angle so that less of the wood was used to achieve my 1” overhang. Then I could flip the board and use it in the other direction, minimizing waste and cost. To fasten the boards, I used 1 3/8” 18 gauge brad nails
Step 7: Trimming the overhang
“If I just had the right tools, I could do anything,” my grandfather would always say. Well, this is one of those moments where nothing could be more true.
While it’s possible to achieve a nice cut with a standard circular saw (if you’re really good), nothing will provide a better cut than a track saw. These make critical straight cuts look easy.
But, if you’re like most people, you don’t have one of these and aren’t planning to buy one soon. So take your standard circular saw and learn a cheater’s way to the next best thing.
You will need to buy these clamps to make these cuts straight. Measure from the outside edge of your saw to the saw blade. Mine measured around 1.5”, so I placed a long straight board on the table at 1.5” back from where I wanted to make my cut.
Clamp your board down on either end and run your saw along the board, making sure to keep light pressure against the board with the edge of your saw to ensure that you stay on the line. Don’t push too hard though, or you’ll bend the board out of its perfect line. Repeat this process for all 4 sides.
Step 8: Table edge
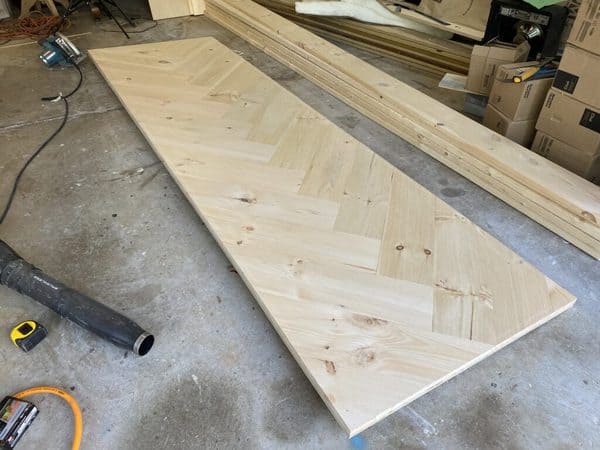
This is the easy part. Take your 1x2s you bought from Step 3 and cut them and install them. While many people miter a 45 degree angle at this joint, I have found that a square cut with overlaps has more holding power. But this is mostly an aesthetic decision, so do what you like!
Step 9: Finishing the table
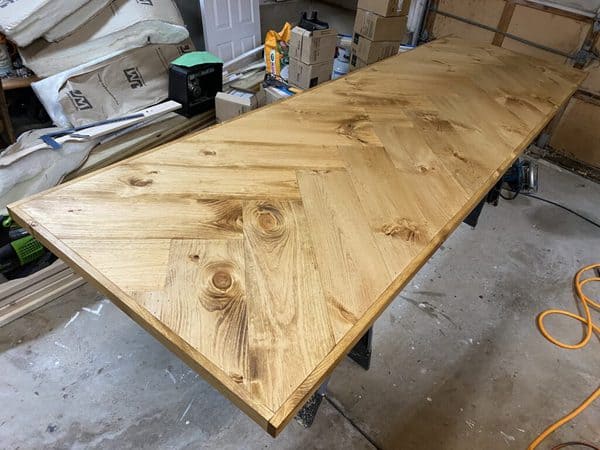
If you’re staining the wood, use Minwax oil based products or Varathane oil based products.
Test these out on scraps to make sure you like the look. After 12 hours of dry time, you’re ready to apply the clear coat.
I typically use Marine Spar Varnish (prepare yourself, it’s expensive) because it flexes better with wood expansion and contraction over time that traditional polyurethane.
A less costly option is Spar Urethane. You’ll need to apply at least three coats, allowing 24 hours between them. Once each coat is fully dry, lightly sand the wood with 220 grit sand paper and thoroughly clean it before the next application.
Even your final coat will require an extremely light sanding and cleaning to make sure it’s as smooth as possible. The more coats (up to around 6) you do, the better and more consistent your table top will be.
We’ll review our favorite brown wood stain options soon, but for now we’ve shared our favorite grey wood stain options.
Step 10: Table base
You can buy prefab table bases online or build a custom one yourself. We’ll probably show you how to build your own base at a later date if you’d like to tackle that part yourself, too.