Why skipping grout sealer could ruin your tile job and how to seal grout yourself

Once upon a time, before we knew a lot about tile and grout, we had someone tile our bathroom. The tile expert left and never mentioned a word to us about the importance of grout sealer.
So guess what?
Our beautiful bathroom looked like a wreck in just six months time. The grout had significantly faded and essentially looked like it had been in our bathroom for years.
We’ve since wised up and don’t complete a tile job without sealing the grout. Wondering if grout sealing is necessary for your home? We’ve outlined exactly when and why sealing grout is crucial and how to go about doing it–even if you’re not handy!
This post contains affiliate links. Read my policy here.
Is it necessary to seal grout?
Oh yes. If you’re reading this thinking you could maybe skip this step, I’m super sorry to be the one to burst your bubble, but speaking from experience, you stand to ruin your grout if you don’t seal it.
Most grouts, other than those that do not require sealing like epoxy grouts, are extremely porous. Grout is cement-based and the pores will literally take in all the stains, grime and bacteria that lands on them if they aren’t sealed.
In other words, if at this very moment you are standing on a tile floor with grout that isn’t sealed and you spill red wine, your new grout will be stained and ruined!
Additionally, because unsealed grout takes in everything, every time you clean grout that isn’t sealed, you’re essentially making it worse, as the dirty water is getting reabsorbed back into the grout!
Precautions to take with grout sealer
The chemicals in grout sealer are heavy duty. It’s best to make sure pets and children aren’t around when you apply the sealer. It’s a good idea to wear protective eye gear, a mask and gloves.
Don’t forget to vent the area by opening up windows for several hours, allowing the house to air out. Once you’re done with the white cloth you use to wipe the sealer off with, toss it.
Materials needed to seal grout
- Gloves
- Mask
- Protective eye gear
- Grout sealer applicator
- Grout sealer
Choosing the right grout sealer applicator
Depending on the size of your grout lines, you’ll want to choose an application method that will work to cover your grout lines.
There are several grout applicators you can use:
My absolute favorite way to apply grout sealer is with a simple foam brush. These foam brushes that are typically used for crafting projects are perfect for sealing grout because of their angled brush.
To use a foam brush, pour some sealer in a small cup and just dip the foam brush into the sealer and apply on grout lines.
Another way you can apply grout sealer is by using a bottle brush. Simply fill the bottle brush with grout sealer and paint on the sealer.
There’s also a roller bottle that works very similarly to the brush bottle. I found this method to be far less precise than both the bottle brush and foam brushes, and quite messy. But still some like this method for larger grout jobs because you can quickly roll the sealant on.
If you need to seal grout lines on a large area like a kitchen floor, save your back by taping a brush to a broom handle and simply painting on the sealer without getting down on your hands and knees.
Which grout sealer should I choose?
Just like with anything else, you get what you pay for. When it comes to grout sealer, here are our picks for good, better, and best:
Custom Building Products: Grout and tile sealer– Good
If you don’t want to paint sealer on every single joint, you can opt for a spray sealant. I’m not a huge fan of spray grout sealer, but it does a decent job. Make sure you’re really vigilant about wiping off excess sealer that will be on your tiles if you use the spray option.
Miracle Sealants 511–Better
Miracle Sealants 511 is a great choice for any grout sealant job and is more cost effective than higher-end products, but still gets the job done.
Aqua Mix Sealer’s Choice Gold–Best
This is the grout sealer we have used before and were very pleased with. Aqua Mix is the one that is highly recommend by tile professionals and is professional grade. It is more expensive, but does last for years.
If you’d like to darken your grout or give it a permanent “wet” look you want to look for a product that says grout sealer and enhancer.
When’s the best time to seal grout?

Do not skip over this part-sealing your grout too early could ruin it!
Before you seal grout it must be fully cured. For most grout products, you want to wait at least 24 hours before applying any grout sealer.
To be completely safe, make sure to ask your tile expert exactly how long you should wait to seal your grout. Many experts say the longer you can wait, the better.
How to seal grout
Most people are super intimidated by the grout sealing process, but once you understand the steps, it’s really not too bad. If you’re sealing brand new grout, you’ll need to devote a couple hours (more or less depending on the amount of grout present).
If you’ve been living or showering in the space with grout that hasn’t been sealed, you can still seal it, you’ll just need to devote more time to the overall project to really clean the grout before it’s sealed. Follow the instructions below to read about the cleaning process.
How to seal a grout backsplash
Step 1: Make sure your grout is completely clean. If you’ve just cleaned it, let it sit overnight and plan to apply sealer the next day.
Step 2: Place a drop cloth down to cover your countertops
Step 3: Using your chosen method to apply sealer, start in the corner and work your way systematically through the grout, taking care not to miss any grout lines. You will likely get a little on your tiles, but that’s okay, as you can wipe it off.
Step 4: Wait 5-7 minutes or follow the instructions on the bottle for the exact amount of time to wait until you wipe the tiles off with a dry, white cloth. You’re not wiping off the sealer from the grout, just really getting excess sealer that’s on your tiles with this step.
Step 5: Wait until the sealer is dry and apply a second coat.
If you plan to cook in the kitchen for the next three days make sure to protect the backsplash, as the sealer won’t be completely cured until 72 hours.
Note: If you have a natural stone in your backsplash like terracotta tiles, you will need to seal them as well.
How to seal grout in a shower
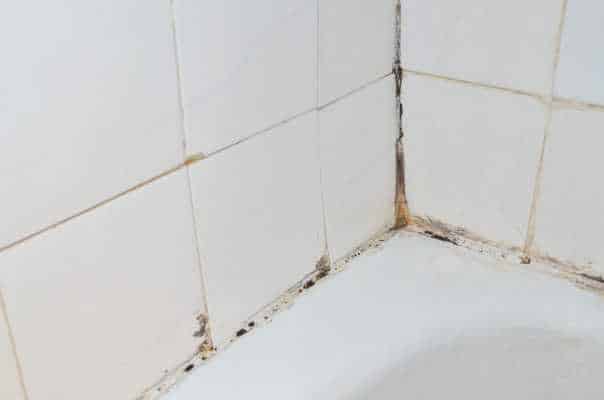
Note: If you notice mold, or have excessive moisture behind your tiles you cannot simply seal your grout to remedy the problem. It’s best to call a tile expert in to see if you need to have a section of your tile removed and replaced, first.
Step 1: Ensure grout is completely clean. You don’t want to seal grout that’s dirty. Once it’s completely clean, wait until the next day to apply your grout sealer.
Step 2: Choose your method of grout sealing applicator and systematically work your way through all grout surfaces, ensuring all grout lines are covered and taking care not to get too much grout on the actual tile.
Step 3: Wait 5-7 minutes and wipe the area you’ve already done with a dry, white cloth. This process is to make sure any sealer that you got on the tile is wiped up before it dries on the tile, so it’s best to wipe everything down at exactly the 5-7 minute mark.
Step 4: Wait until the first coat is dried (1 hour or so) and apply the second coat, remembering to wipe everything down after 5-7 minutes.
Step 5: Let the grout sealer dry completely before using the shower again. For best results wait 72 hours.
Wondering how black grout or even white grout on the floor hold up over time? Make sure to read my reviews!
If you opt for a spray grout sealer, the process is as follows:
Spray grout sealer all over surface where grout is (you’ll cover the tiles in sealer in the process). Let product sit for length of time indicated on the back of the bottle, then wipe up with a dry, white cloth.
Note: You may opt for a spray solution if your tile has an excessive number of grout lines, like small hexagons or tiny rectangles.
What happens if I notice grout sealer has dried on my tiles or glass shower door?
Read the instructions on the back of the grout sealer you’ve chosen, but for the most part, putting grout sealer back on the area reactivates the product and you are then able to easily wipe the excess grout sealer off.
How often should you seal your grout?

Many people make the mistake of initially sealing their grout and then never thinking about it again. Unfortunately, grout and tile does require on-going maintenance. Depending on the use your grout gets and the cleaners you use, you’ll need to apply your grout every six months to a year.
If you’re someone that always cleans with harsh products like bleach, you’ll likely have to seal your grout every six months or so. Likewise if the area where your grout is doesn’t have adequate venting (like some bathrooms), you might have to seal your grout more often too.
Most of the time, you’ll be fine with sealing your grout on a yearly basis. It’s really just a 30 minute chore once a year that keeps your grout looking clean and bacteria free, plus cleaning is much easier when you don’t have to scrub the grout lines all the time!
You’ll know your grout is in need of sealer by performing the water test. Place a few drops of water directly on your grout line and watch what happens: if the water beads up and runs off the grout line, you’re in the clear.
What if I’ve used my shower for a while without sealing it, can I still seal the grout?
Yes, you can still seal your grout if you’ve used your shower for a while, but you’ll need to make sure it’s completely clean, first.
If you’ve just used your shower for a short amount of time, a thorough cleaning with a mixture of baking soda and peroxide might do the trick.
On the other hand, if you’ve been showering without sealed grout for quite some time, you might notice that some of your grout lines are discolored.
You might even see that your white grout has turned grey, black or brown or your black grout has turned a light gray or even white. If that’s the case you’ll need to do some heavy duty cleaning first to remove the discoloration on your grout.
For heavy duty cleaning, we suggest Sulfamic Acid crystals, and a nylon grout brush.
Don’t skip grout sealer if you want to keep your tile looking like new
The first time you apply grout sealer to your grout lines it may take a little longer, but you’ll find that with each subsequent application the process should take no longer than 30 minutes.
Bottom line: if you want to keep your grout looking like it did the day it was installed make sure to seal it after it’s installed and then annually going forward. Remember to periodically perform a water test to see if the water still beads up over the grout lines.
Have questions about sealing your grout? Leave your question in the comments!